
If you have a rotor that needs to be replaced, the screws may need to be removed first. Use a drill bit with a slightly smaller diameter than the screw and carefully drill through the plastic cover around the screw.
Then use an adjustable wrench or pliers to remove the screw from its housing. After all of the screws are removed, it is time to replace the rotor.
The most common way to remove rotor screws is by using a drill bit and an impact driver. Another option is using screw extractors—these tools fit over the head of the screwdriver and help pull out the screw without damaging it or your tool.
Finally, you can also use a wrench on hex-head bolts if they’re not too tight or if you don’t have an impact driver or extractor handy. Once all of the screws are removed, be sure to clean everything thoroughly before reassembling your lawnmower.
Contents
How To Remove Rotor Screws
If you’re having trouble removing the rotor screws on your car’s wheel hub, follow these steps:
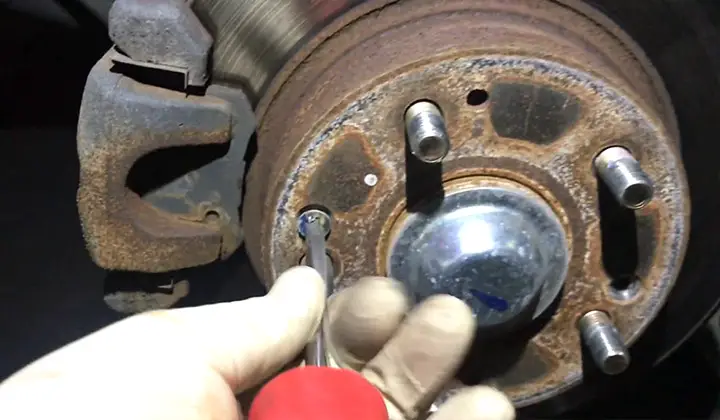
Locate the six screws that hold the wheel hub in place. These are usually located around the edge of the wheel hub.
Remove each screw with a Phillips head screwdriver. Be careful not to lose any of them. Once all six screws have been removed, lift up on the wheel hub and it should come off easily.
Removal Procedure
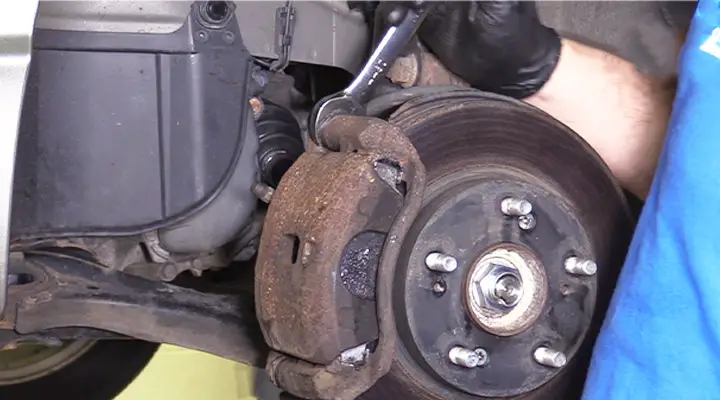
The rotors on your car are held in place by two screws, which you can remove to adjust or replace the brake pads and calipers. The removal procedure is as follows:
- Disconnect the battery cables
- Remove the wheel well cover
- Remove the four-rotor bolts using a screwdriver or wrench (two at each end of the rotor.
- Be careful not to damage the mounting hardware when removing these bolts.
Checking And Adjusting Rotor Position
Once the rotor bolts have been removed, it’s time to check and adjust their position.
To do this, simply loosen one of the three adjusting nuts located at either end of each rotor and rotate it until you get a good fit between hub and rim (see image below).
Tighten this nut once you’ve achieved a perfect fit. Note that if your brakes need adjustment beyond just moving/adjusting these three nuts then please contact us for assistance as we cannot provide further advice on this matter.
Reinstalling Rotor Screws & Wheel Well Cover
Once you’ve adjusted/moved your rotors, reattach them using new screws (supplied with kit), wheel well covers, and battery cables – reverse order of removal steps.
How To Know Rotors Need To Be Resurfaced
If you notice that your car’s rotors are starting to look worn, it is time to have them resurfaced. Rotors are the discs that help prevent your car from skidding on snow and ice.
Over time, these discs can become warped and cracked, which can lead to decreased braking power.
Brake pedal pulsates
When the rotor needs to be resurfaced, the brake pedal will usually pulsate as it is being applied. This indicates that there may be a problem with your braking system and you should take action as soon as possible.
Pinging noise from brakes
If you hear a ping or thumping sound when you apply the brakes, this could mean that your rotors need to be resurfaced.
The cause of this issue can vary depending on the make and model of your car, but it is usually indicative of them needing replacement.
Sluggish acceleration
When your rotors are worn out, they can impact how quickly your car accelerates from a stop – which can lead to decreased fuel efficiency and reduced performance overall.
If you’re having trouble removing one of these screws, try tapping it gently with your knuckle before trying to unscrew it by hand; sometimes this can loosen up the screw head enough for you to dislodge it easily.
FAQs
Are the Screws on Brake Rotors Necessary?
The screws on brake rotors are used for a specific purpose, which is to stop the rotation of the rotor when you apply pressure to the brake pedal.
Without these screws, it would be impossible to stop your car from rolling when you apply pressure on the brake pedal.
What Size Are Brake Rotor Screws?
The screw diameter is typically between 0.064 and 0.074 inches, but it can be anywhere from 0.063 to 0.078 inches depending on the manufacturer and type of brake rotor used.
What Happens if You Replace Brake Pads Without Turning the Rotors?
If you replace the brake pads without turning the rotors, you will have to replace them sooner than if you had turned them.
This is because when you turn them, you can use more of your braking power and get a greater stopping distance from each brake pad
Can I Resurface My Rotors Myself?
If you have a fixed-pitch rotor, then resurfacing it yourself is possible but not recommended because the process requires specialized tools.
Is It Cheaper to Resurface or Replace Rotors?
In a lot of cases, it is cheaper to resurface than to replace a rotor.
How Long Do Resurfaced Rotors Last?
The lifespan of resurfaced rotors is determined by how they are used. If they are only used occasionally, resurfaced rotors will last for a long time.
Can I Just Replace Front Rotors?
Front brake rotors can be replaced, but it is not recommended unless the brake pads are also replaced.
To Recap
There are a few ways to remove rotor screws, but the most effective is using a drill bit with a magnetic bit holder.
Make sure the screwdriver you use has a magnetic tip and that the screw head is facing down when drilling into the screw – this will hold it securely in place while you remove it.
Once all of the screws have been removed, be careful not to damage or lose any of them – they may come in handy later on.
Finally, don’t forget to clean up any debris left behind by removing those pesky rotor screws – they can cause major headaches if not cleaned properly.